"Antique" Shire Map
Jun. 1st, 2006 10:14 amThis is one of my earliest crafts. It is a mock "stone plaque" map of the Shire, which hangs on my bedroom wall. I made two of these, one of them was for ![[livejournal.com profile]](https://www.dreamwidth.org/img/external/lj-userinfo.gif) coneygoil, as a Christmas gift.
coneygoil, as a Christmas gift.
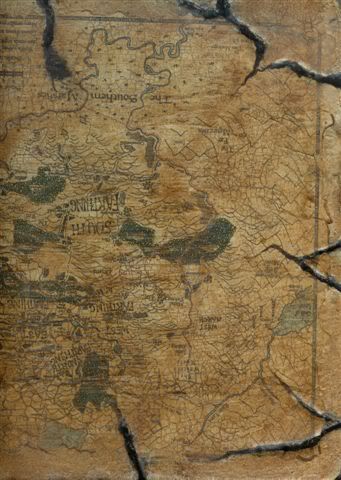
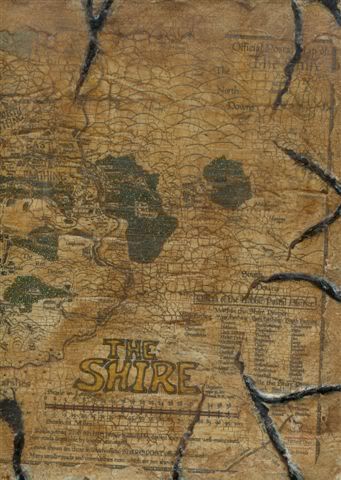
The pictures show the two halves of the plaque; it's a scan, not a photo--I could not take a photo that did not have a shiny glare spot in the middle.
danachan helped me to post these.


Here's how I made the plaques:
I made an 11"x14" copy of a Shire Map I found online. It's the "Postal Map" found at-- http://www.shirepost.com/ShireMap.html
Then I got a piece of white styrofoam. The peice I used was 12"x30", so I cut it down to 12"x15". I then used a craft knife to help me make "cracks" around the edges, and coated it with a layer of acrylic modeling paste (found in art supplies). Once that dried, I applied a coat of gesso, and then after that I applied a generous coat of Mod Podge (a special thick white glue used for decoupage).
I carefully placed the map over the styrofoam while the Mod Podge was still wet, making sure to keep it as wrinkle free as possible, and then applied another coat of Mod Podge over the top of that. While it was still wet, I used a combination of my fingers and a small popsicle stick to carefully tear the map into the "cracks" I had previously made.
After the second coat of Mod Podge dried, I thinned some burnt umber acrylic craft paint with gel medium, and used a foam brush to apply it over the whole map; then I wiped the paint off with a rag. I repeated this until I got the antique color and look I wanted. I used a tiny paintbrush to work more burnt umber into the "cracks".
Once the paint was completely dry, I used a product called "Fragile Crackle". This is a crackle medium made especially for paper, and it results in a fine web of tiny cracks over the whole surface.
I applied and rubbed off one more coat of burnt umber, so as to emphasize the crackle.
When this was dry, I coated the whole thing with an acrylic sealer.
Finally, I turned it over, and inserted two floral wire hangers in the back, which I reinforced with strapping tape. It looks like a slab of stone from the front, but of course, weighs next to nothing, being made of styrofoam.
The pictures show the two halves of the plaque; it's a scan, not a photo--I could not take a photo that did not have a shiny glare spot in the middle.
Here's how I made the plaques:
I made an 11"x14" copy of a Shire Map I found online. It's the "Postal Map" found at-- http://www.shirepost.com/ShireMap.html
Then I got a piece of white styrofoam. The peice I used was 12"x30", so I cut it down to 12"x15". I then used a craft knife to help me make "cracks" around the edges, and coated it with a layer of acrylic modeling paste (found in art supplies). Once that dried, I applied a coat of gesso, and then after that I applied a generous coat of Mod Podge (a special thick white glue used for decoupage).
I carefully placed the map over the styrofoam while the Mod Podge was still wet, making sure to keep it as wrinkle free as possible, and then applied another coat of Mod Podge over the top of that. While it was still wet, I used a combination of my fingers and a small popsicle stick to carefully tear the map into the "cracks" I had previously made.
After the second coat of Mod Podge dried, I thinned some burnt umber acrylic craft paint with gel medium, and used a foam brush to apply it over the whole map; then I wiped the paint off with a rag. I repeated this until I got the antique color and look I wanted. I used a tiny paintbrush to work more burnt umber into the "cracks".
Once the paint was completely dry, I used a product called "Fragile Crackle". This is a crackle medium made especially for paper, and it results in a fine web of tiny cracks over the whole surface.
I applied and rubbed off one more coat of burnt umber, so as to emphasize the crackle.
When this was dry, I coated the whole thing with an acrylic sealer.
Finally, I turned it over, and inserted two floral wire hangers in the back, which I reinforced with strapping tape. It looks like a slab of stone from the front, but of course, weighs next to nothing, being made of styrofoam.
no subject
Date: 2006-06-01 04:11 pm (UTC):D
no subject
Date: 2006-06-01 05:30 pm (UTC)no subject
Date: 2006-06-01 04:54 pm (UTC)no subject
Date: 2006-06-01 05:30 pm (UTC)no subject
Date: 2006-06-02 12:47 am (UTC)no subject
Date: 2006-06-01 07:04 pm (UTC)no subject
Date: 2006-06-02 09:45 am (UTC)no subject
Date: 2006-06-02 12:45 am (UTC)no subject
Date: 2006-06-02 09:45 am (UTC)no subject
Date: 2006-06-02 04:57 am (UTC)no subject
Date: 2006-06-02 09:46 am (UTC)